
No-code product development
Make your product smart without writing a single line of code.
Make your product smart without writing a single line of code.
The No-code development allows you to create and configure smart products using the Shelly X manufacturer portal without any software development.
This approach is designed for hardware developers and product teams who need a fast and structured way to define device behavior, connectivity, and cloud features through a visual interface.
You need to define basic product features (e.g. relay toggling, button input, sensor triggers, status LEDs).
You want to prototype or launch products quickly without managing custom firmware.
You prefer to focus resources on core business areas and use a visual interface for configuration.
You want integrated versioning, testing, and deployment alongside configuration and monitoring in a single portal.

If your product requires functionality beyond the available configuration options, a low-code approach may be needed.
Step 1:
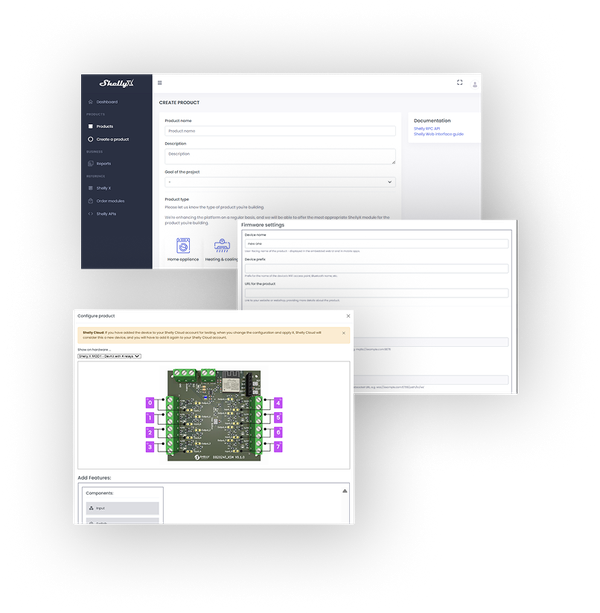
Define your product
Use the manufacturer portal to describe your product, select the appropriate Shelly X module, and set required capabilities.
With your OEM account, you gain access to product management and provisioning tools. You can invite team members, manage product configurations, and use all Shelly X development features. An active OEM account is required to apply and test feature configurations.
Sign upStart a new product entry by specifying its name, type, and preferred development method.
Note: The development method cannot be changed later.
Add branding details such as the product image for the Shelly mobile app, a URL with product information, and a short description.
The portal will suggest only compatible modules and development kits based on your selected product type and development method. Review the available Shelly modules by their functionality, I/O interfaces, and power specifications. Choose the module that best aligns with your product’s hardware and intended use. Confirm the entry to proceed to the next step.
Explore all Shelly X modulesIf you need help with using the Shelly X portal, selecting compatible modules, or have any general questions, please refer to the documentation section in the portal or contact our technical support team directly.
Contact usStep 2:
Configure the Shelly X module
Use the interactive diagram builder to set up device behavior, hardware mapping, connectivity protocols, and cloud options without writing code.
Begin by launching the configuration flow to access the built-in interactive diagram editor. Use this tool to select the required features and capabilities for your product.
Define all necessary parameters, including pin mapping, trigger behavior, supported actions, and user controls. You can revisit and modify the configuration at any time to accommodate product changes or new versions.
Define a product prefix – this name will be used for Bluetooth and Wi-Fi discovery and can vary across different configuration versions.
You can also enable firmware features like MQTT or WebSocket and set their respective endpoint URLs as part of this setup.
Activate Developer mode to simplify testing and debugging. Set up a Wi-Fi SSID and password that your product will automatically connect to when powered on. This network access allows for direct communication during development and service testing.
The Developer mode is automatically disabled when the final configuration is prepared for manufacturing.
Each time you update your configuration, the platform automatically creates a new version with a unique ID. This lets you track changes, test different setups, and roll back if needed.
Once you save your initial configuration, the selected module cannot be changed.
Step 3:
Apply, test, and prepare for production
Download the configuration token or apply it directly to your Shelly X module via Bluetooth. Power on your product, verify that it loads the correct settings, and test all configured features. Make adjustments in the portal if needed and reapply the token for further testing.
From your product’s detail page in the portal, use the dedicated dialog to apply the configuration token. The process includes a progress indicator and log output for troubleshooting and verification.
You can also apply the configuration token via the device’s local web interface.
First, download or copy the token from the same dialog.
Connect to the Shelly X device’s Wi-Fi Access Point.
Open http://192.168.33.1 in your browser.
Go to Settings → Shelly X → Apply Configuration.
Paste or upload the token, and click Save.
Connect your Shelly X module to the target hardware.
Validate key behaviors such as relay operation, button responses, and LED indicators.
Confirm Wi-Fi connectivity, cloud access, or local-only functionality based on your setup.
Review the user interaction and make adjustments if needed.
Step 4:
Manufacture, release, and analyze the results
Place your manufacturing order, launch your product, and track results through the dashboard and customizable reports in the Shelly X manufacturer portal.
Indicate the number of modules you need and choose your preferred shipping options. The modules will be shipped with your configuration, ready for integration into your product.
Use the portal dashboard to view detailed device activation reports and customize reports to fit your needs.
Monitor firmware versions, analyze regional usage patterns, and track connectivity data to optimize your product’s performance.
After launching your current product, start planning your next innovation. Collaborate with us to develop new ideas, improve features, and bring the next generation of smart devices to market faster and more efficiently.
Congratulations! Now your product is